Flowers

Hollyhocks: The Cottage Garden's Most Dramatic Statement (And How to Keep Them There)

Margaret Chen

Margaret Chen

Flower & Ornamental Specialist · Updated April 2026

How to grow hollyhocks — vintage botanical illustration showing the plant in detail

Hollyhocks at a Glance

Sun

Sun

6+ hours full sun

Soil pH

Soil pH

6.0-8.0

Water

Water

1-1

Spacing

Spacing

24-30"

Height

Height

6-8 feet

Soil type

Soil

Well-drained soil

Lifespan

Lifespan

biennial or short-lived perennial

Get your personalized growing data

Enter your zip code for frost dates, growing season, and soil type.

There is a particular kind of magic in a hollyhock in full bloom. Eight feet of fluted, silky flowers stacked like dinner plates up a tower of stem, rising behind a weathered fence or a sun-warmed stone wall. They are the vertical anchor of the cottage garden, and nothing else quite replicates what they do -- not delphiniums, not foxgloves, not climbing roses. The scale is different. The presence is different. They stop people on the sidewalk.

And then, far too often, they die badly. Leaves consumed in orange rust from the ground up. Plants yanked in frustration. The grower concludes hollyhocks are difficult and moves on.

They are not difficult. But they do have a personality -- one that rewards understanding and punishes a handful of very specific mistakes. Get those wrong and you will fight this plant for years. Get them right and hollyhocks will naturalize into a self-sustaining colony that returns every summer, taller and more abundant, with barely any intervention from you.

This guide is built from the ground up to give you that second outcome.


Quick Answer: Hollyhocks Growing at a Glance

USDA Zones: 3 through 8 (some varieties to zone 9 in favorable microclimates)

Sun: Full sun required -- 6+ hours of direct sunlight daily

Soil pH: 6.0-8.0 (remarkably tolerant; drainage matters far more than pH)

Drainage: Non-negotiable. Hollyhocks will not survive wet feet. Test before planting.

Spacing: 24 inches minimum; 30 inches in humid climates

Watering: Drip or soaker hose only -- overhead watering spreads rust disease

Life cycle: Biennial (year 1: leafy rosette; year 2: 6-8 ft flower spike; year 3+: self-sown colony)

First bloom: Year 2 from seed (or year 1 from early-started varieties like Indian Spring)

Height: 5-8 feet (standard); 20 inches (Queeny Purple dwarf)

Rust resistance: Varies widely -- Alcea rugosa (Russian hollyhock) is nearly immune; common Alcea rosea is highly susceptible

Staking: Required for tall varieties; plant against a wall or fence whenever possible


The Biennial Secret That Changes Everything

Before you choose a variety, before you prepare the soil, before you plant a single seed -- you need to understand the hollyhock life cycle. It is the single fact that explains most hollyhock disappointments, and once you understand it, everything else clicks into place.

Most hollyhocks are biennials or short-lived perennials. That means:

Year 1: You plant a seed. It grows into a low, spreading rosette of large, rough-textured leaves -- something like an oversized rhubarb plant hugging the ground. It puts every ounce of energy into developing its taproot. No flowers appear. This is not failure. This is the plant doing exactly what it should do.

Year 2: The stored energy in that taproot ignites. A flower spike rockets upward to 6-8 feet. Flowers open sequentially from bottom to top -- single or double blooms in white, pink, rose, red, maroon, near-black, or golden yellow -- over 4 to 6 weeks in mid-summer. Then the plant sets seed and, in most cases, dies.

Year 3 and beyond: Self-sown seedlings appear within 2-3 feet of the parent plant. Some of them bloom while their siblings form rosettes. You now have flowers every summer, automatically, without replanting.

This is why the most common hollyhock complaint -- "my plant grew all season and never bloomed" -- is not a problem at all. It is year one proceeding normally. The fix is not to pull the plant. The fix is patience, and a willingness to plant two cohorts of seeds in the first year so that you always have both first-year rosettes and second-year bloomers in the garden simultaneously. By year three, you will not be replanting anything. The hollyhocks will take care of themselves.

There are exceptions. Indian Spring, Spring Celebrities, and Queeny Purple can all bloom in their first year when started indoors 9 to 12 weeks before the last frost. And Alcea rugosa, the Russian hollyhock, behaves as a true perennial -- persisting and reblooming for three to five years, particularly in cooler zones. If you are in zone 3 or 4 and want something permanent rather than biennial, A. rugosa is worth knowing well.


Best Hollyhock Varieties by Zone

Choosing the right variety for your zone is the second most important decision you will make after understanding the biennial cycle. The key variable is not cold hardiness -- hollyhocks are remarkably winter-tough across zones 3 through 7. The key variable is rust resistance, and it maps almost perfectly to humidity. The wetter and warmer your summers, the more rust pressure you face, and the more your variety selection needs to account for it.

What zone are you in?

Enter your zip code for frost dates, growing season, and soil type.

Here is the landscape before we go zone by zone. There are three main hollyhock species worth knowing:
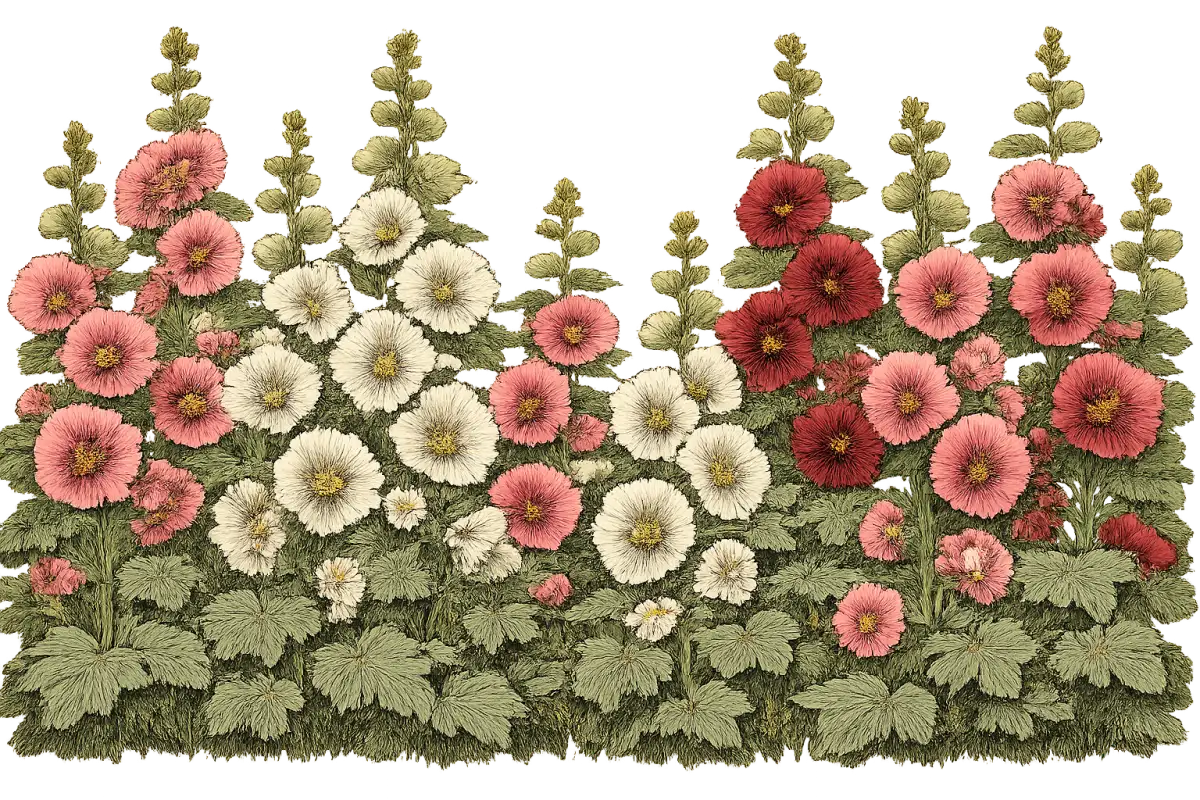
Alcea rosea -- the common hollyhock, 5-8 feet tall, available in the full spectrum from white to near-black. The source of nearly every named cultivar. Also highly susceptible to rust disease. Beautiful and worth growing, but requires rust management.

Alcea ficifolia -- the fig-leaf hollyhock, 5-7 feet, with deeply lobed foliage that is stunning even without bloom. Flowers run to warm tones: yellow, orange, copper, cream, pink. Significantly rust-resistant. An excellent choice for humid zones.

Alcea rugosa -- the Russian hollyhock, 5-7 feet, yellow flowers only, and nearly immune to rust. It also tends toward true perennial behavior in cold climates, returning reliably for years. The single color limitation is a real trade-off, but for growers in high-humidity zones who are tired of fighting Puccinia, this plant is a revelation.

Cold Zones (3-4): The Best Hollyhock Territory You Did Not Know About

Zones 3 and 4 are, counterintuitively, some of the best zones in the country for growing hollyhocks -- particularly the classic Alcea rosea varieties. Cold winters kill overwintering rust spores in the soil, keeping disease pressure low and making the elaborate rust prevention strategies described later in this guide largely unnecessary. You can grow showier, less rust-resistant varieties here without paying the price that zone 6 growers do.

Chater's Double is the quintessential choice in zones 3 and 4. Fully double blooms -- ruffled, peony-like -- in pink, red, white, yellow, salmon, and violet. It is fully hardy to zone 3, self-sows reliably, and represents the classic cottage garden hollyhock at its most extravagant. Plant it behind a wooden fence or split-rail and let it go.

Nigra is worth growing for the drama of it. A near-black single flower on a 5-8 foot spike. Against a white-painted wall or a pale fence, it is one of the most striking things you can put in a garden. Fully hardy and happy in the cold.

Indian Spring earns its place in zone 3 for a practical reason: when started indoors in late February or early March -- about 9 weeks before last frost -- it can bloom in its first year. In a zone where the growing season is only 90-120 days, the ability to skip the waiting year has real value. The flowers are single to semi-double, in a pink, rose, and white mix, on 5-7 foot spikes.

Alcea ficifolia rounds out the zone 3 and 4 recommendation. Even where rust is not a significant problem, ficifolia earns its place through sheer ornamental quality. The deeply lobed, fig-like leaves are beautiful from spring through fall, and the warm-toned flowers -- copper, orange, gold -- complement the palette of late summer perennials and ornamental grasses beautifully.

Zone 3 timing: start seeds indoors in late February or early March for transplant after last frost (late May or early June), or direct sow in mid-May. Self-sowing works reliably in zone 3 -- volunteer seedlings have all season to establish under snow cover.

Temperate Zones (5-6): Prime Hollyhock Country

Zone 5 is prime hollyhock territory. Long enough season for robust growth, cold enough winters to keep rust reasonably in check. You have the widest variety selection of any zone and can grow essentially any Alcea rosea cultivar with standard cultural management.

Chater's Double is as beautiful here as it is in zone 3. Add Nigra for its architectural contrast -- those near-black blooms look magnificent against pale pink companions like phlox or echinacea.

Halo Series adds something the other cultivars do not: a contrasting dark eye zone on each flower that gives the blooms a more sophisticated, intentional look. Slightly shorter than Chater's (5-6 feet rather than 6-8), which means slightly easier staking. The contrasting eye reads beautifully at a distance.

Queeny Purple deserves mention in zone 5 for its versatility. At only 20 inches tall, it does not need staking, can be grown in containers, and blooms in its first year. It is an AAS winner, which means it has been tested and verified across multiple growing conditions. If you want hollyhock presence on a patio or in a smaller garden, this is the plant.

For lower maintenance in zone 5, Alcea ficifolia provides good rust resistance with those warm, luminous flower tones that mix particularly well with salvias, rudbeckias, and late-summer native grasses.

Zone 6 is where rust management starts to matter in earnest. The humidity levels of the Ohio Valley, Mid-Atlantic, and mid-continent corridors give Puccinia malvacearum a real foothold. In zone 6, consider shifting your backbone planting toward Alcea ficifolia and Alcea rugosa while reserving Alcea rosea cultivars for areas with exceptional air circulation and sun exposure.

Indian Spring works well in zone 6 treated as a managed biennial -- start fresh plants annually, enjoy the single-to-semi-double flowers, remove all debris after bloom, and rotate the planting location if rust was severe.

Spring Celebrities -- compact at 3-4 feet, double-flowered, first-year blooming -- functions as a near-annual in zone 6, which is actually an advantage: you sidestep the biennial rust accumulation cycle by replacing plants each season.

Humid Eastern Zones (7-8): Where Species Selection Becomes Essential

In the humid Southeast and Mid-Atlantic at zone 7, conventional Alcea rosea hollyhocks will get rust. This is not a probability; it is a certainty. The question is when, and how severe, and whether you are willing to manage it through the season. For growers who want lower-maintenance beauty, zone 7 East is where the recommendation shifts decisively toward rust-resistant species.

Alcea rugosa is the most important plant recommendation in this zone. It is virtually rust-immune. It flowers reliably in yellow. In zone 7, it often behaves as a true perennial rather than a biennial, returning for multiple seasons without replanting. Plant it as the permanent vertical framework of your border and it will earn its place without drama.

Alcea ficifolia provides more color range -- those warm copper, orange, and cream tones -- with significantly better rust resistance than A. rosea. In zone 7, ficifolia is the middle ground: not quite as rust-proof as rugosa, but far more color-diverse.

If you insist on Alcea rosea in zone 7 East (and the colors are genuinely worth wanting), treat it as a cool-season annual strategy: start seeds very early indoors in January or February, transplant after last frost, enjoy the summer bloom, and remove and discard the entire plant before rust spreads. Do not compost it. Do not leave the debris. This approach requires annual effort but delivers the full color palette.

Queeny Purple in a container on a porch or patio with excellent air circulation is another zone 7 option worth considering. Container growing isolates the plant from soil-borne spores and typically improves air circulation.

In the drier Pacific Northwest at zone 7, the calculus reverses. Cooler, drier summers mean Alcea rosea varieties perform beautifully with standard cultural management. The rust-resistant species recommendation applies specifically to the humid eastern corridor.

Zone 8 is hollyhocks at the edge of their comfort zone, especially in the humid South and Gulf Coast. Alcea rugosa is the most reliable long-term choice. Alcea ficifolia with a morning sun/afternoon shade orientation extends the usable growing season. In coastal Pacific Northwest zone 8, cooler summers make even standard A. rosea varieties viable.

Quick Reference Table: Top Picks by Zone Group

Zone GroupTop VarietiesTypeWhy
3-4Chater's Double, Nigra, Indian SpringA. roseaLow rust pressure; full color range available; cold winters keep disease in check
5-6Halo Series, Chater's Double, A. ficifoliaA. rosea / ficifoliaPrime growing zone; ficifolia as rust pressure increases in zone 6
7 (East)A. rugosa, A. ficifolia, Indian Springrugosa / ficifolia / roseaHigh humidity demands rust resistance; rosea treated as annual
7 (West/PNW)Chater's Double, Nigra, A. ficifoliaA. rosea / ficifoliaDrier climate; A. rosea viable with standard management
8A. rugosa, A. ficifolia, Queeny Purplerugosa / ficifolia / rosea dwarfRust-resistant species essential in humid East; containers on patios

Site Selection and Placement: Getting This Right First

Hollyhocks are not relocatable. That is the single most important design constraint you are working with, and it shapes every placement decision. The deep taproot -- often 12-18 inches long by the end of the first growing season -- does not survive transplanting once established. Choose the permanent location before you plant, and treat that choice as irreversible.

The Sun Requirement

Full sun means 6 or more hours of direct sunlight per day, and hollyhocks are serious about this. In part shade, they grow weak and leggy, reaching toward available light and producing fewer buds on stems that cannot support their own weight. They become more susceptible to fungal disease because slower air movement and reduced heat means leaves stay wet longer after rain. The 6-8 foot flower spike is powered by the photosynthetic output of those large rosette leaves. Reduce the light, reduce the energy, reduce the bloom.

The one nuance: in zones 7 and 8, light afternoon shade -- 2-3 hours -- can actually benefit hollyhocks by reducing heat stress during peak summer. But they still need 6 or more hours of direct sun. Morning sun is particularly valuable because it dries dew from leaf surfaces quickly, which matters enormously for rust prevention.

South- and west-facing walls are the ideal placement. They deliver full sun, reflected warmth, and -- this is often overlooked -- wind protection. That last element is critical.

Wind Protection

A hollyhock spike at 7 feet acts like a sail. In exposed positions, without something to break the wind, spikes bend, kink at the base, or snap entirely. The classic cottage garden image -- hollyhocks rising against a stone wall or wooden fence -- is not just aesthetic. It is structurally sound. The wall breaks the wind. The wall provides a surface to loosely tie the stalks to if needed. The wall radiates warmth that extends the season.

The best placements, in order: against a south- or west-facing wall or fence; in the back of a deep border with shorter plants creating a physical buffer in front; along the side of a garage or outbuilding. The worst placement: in the middle of an open bed, exposed to wind from all directions.

Soil and Drainage

Hollyhocks are extraordinarily forgiving about soil quality, pH, and fertility. They grow in sidewalk cracks, rocky mountain towns, and abandoned lots. What they absolutely will not tolerate is wet feet.

The soil pH range is 6.0 to 8.0 -- a remarkably broad tolerance that means most garden soils are fine without testing or amendment. If your vegetables and perennials grow without obvious nutrient problems, your pH is almost certainly acceptable for hollyhocks.

Drainage is another matter entirely. The hollyhock taproot rots in waterlogged soil. Crown rot follows, moving upward through the base of the stem. The plant wilts -- deceptively, because the symptoms look like drought -- and the instinct to add more water accelerates the death spiral. There is no recovery once the taproot is compromised.

Before planting, perform a percolation test: dig a 12-inch hole, fill it with water, let it drain completely, then fill again and time the drainage. If the second fill takes more than 4 hours to drain, amend with coarse organic matter, build a raised planting mound, or use raised beds. If it takes more than 12 hours, choose a different location or commit to raised beds at least 12 inches deep.

In heavy clay soils -- common across the Ohio Valley, Mid-Atlantic, and parts of the Southeast -- work 4-6 inches of coarse compost into the top 12-18 inches and consider planting on a slight mound. Never add sand alone to clay; the combination can create a concrete-like matrix. Always pair sand with organic matter.

Loosen the soil to 12-18 inches deep at the planting site. The taproot needs vertical travel room from the beginning, and compacted soil at 10 inches will slow and deflect it. Mix in 2-3 inches of compost. Then stop. Hollyhocks are adapted to lean soils -- excessive fertility produces the kind of lush, soft foliage that rust loves and flowers less.


Watering: The Rule That Governs Everything Else

There is one rule for watering hollyhocks that supersedes all others: never, under any circumstances, water the foliage.

Wet leaves are the primary infection surface for hollyhock rust, the plant's worst and most universal enemy. Rust spores need as little as 6-8 hours of continuous leaf wetness to germinate and infect. An evening sprinkler session provides exactly those conditions. Overhead watering also creates a second problem: water droplets striking the soil surface splash upward, carrying rust spores from debris and soil onto the undersides of lower leaves -- precisely where infection begins.

Drip irrigation and soaker hoses are the correct tools. Place the drip line or soaker hose 2-3 inches from the stem base and mulch over it with 2-3 inches of organic material to slow evaporation. Water goes directly to the root zone. Leaves stay dry. Rust loses its primary vector.

If you hand water with a hose, keep the nozzle low, directed at the soil, and never let it touch the foliage. If hollyhocks share an irrigation zone with overhead sprinklers, move them or accept that rust management will be a permanent, losing battle.

Watering Through the Life Cycle

The watering schedule changes significantly as plants age, and what hollyhocks need in year one is quite different from what established plants need in year two.

Seed germination (days 1-14): Keep the top inch of soil consistently moist with gentle, light watering -- once or twice daily in warm weather. Heavy watering displaces seeds (planted only 1/4 inch deep) and causes soil crusting. Gentle is the operative word.

Seedling establishment (weeks 2-8): Water deeply enough to moisten the top 4-6 inches of soil every 2-3 days. Deeper, less frequent watering encourages the taproot to grow downward rather than laterally. This is the most important watering decision you will make, because a taproot that has learned to grow deep will sustain the plant through summer drought without complaint.

Established rosette (months 3-6, first season): Once the taproot is 6-12 inches long, the plant is increasingly self-sufficient. Water once or twice per week in the absence of rain, aiming for about 1 to 1.5 inches per week. By late in the first season, supplemental watering is only necessary during genuine dry spells.

Bloom year (second season): The fully developed taproot reaches 12-18 inches and accesses soil moisture well below what shallow-rooted plants can touch. Water deeply once per week, increasing to 1.5-2 inches weekly during peak bloom in hot weather, then reducing as flowering finishes. Do not let the soil dry out completely during bloom -- flowers drop prematurely under drought stress.

One of the hollyhock's most underappreciated qualities is its drought tolerance once established. Those large, rough leaves will wilt in the afternoon heat of a dry midsummer day and recover fully overnight. This is normal transpiration stress, not a crisis. Overwatering an established hollyhock -- particularly one in less-than-perfect drainage -- causes more problems than underwatering.


Hollyhock Rust: The Battle You Need to Understand

Every honest guide to hollyhocks has to reckon with Puccinia malvacearum. Hollyhock rust is a fungal disease caused by a pathogen specific to the mallow family, and it is nearly universal on Alcea rosea. In humid climates, it appears in the first season. In drier climates, it may take a few years. But if you grow common hollyhocks long enough, you will encounter it.

Understanding the disease is understanding why every piece of advice in this guide is shaped the way it is. Rust is not an occasional nuisance. It is the central management challenge of growing hollyhocks, and every cultural decision -- spacing, watering, variety selection, fall cleanup -- either fights rust or feeds it.

What zone are you in?

Enter your zip code for frost dates, growing season, and soil type.

What You Are Looking For

Rust announces itself on the undersides of the lower leaves first: raised orange-yellow pustules, slightly rough to the touch, while the upper surface shows small yellow-orange spots. As the season progresses, pustules darken to reddish-brown and eventually near-black. Infected leaves turn brown, crispy, and die. Defoliation moves upward from the base of the plant, and in severe cases the entire lower two-thirds of a plant is stripped of leaves, leaving a bare brown stalk topped with flowers -- functional, but not beautiful.

The disease cycle repeats every 10-14 days under favorable conditions, and spores are wind-dispersed as well as water-splashed, which is why overhead watering is so destructive and why infected plants in a tight group infect every neighbor within days.

The Prevention Hierarchy

No strategy eliminates rust entirely on susceptible Alcea rosea varieties. The goal is severity reduction.

Spacing is the most effective cultural defense. Plant at least 24 inches apart -- 30 inches in humid zones. Good air circulation means leaves dry faster after rain or dew. The difference between a 12-inch-spaced and 30-inch-spaced hollyhock stand in a humid zone 6 summer is not subtle. The tight planting looks like a rust test by August. The wide planting looks like a garden.

Drip irrigation rather than overhead watering eliminates the primary spore-splash vector and prevents the extended leaf wetness that spores need to germinate. This alone reduces rust incidence dramatically.

Fall cleanup is the most impactful single action you will take all year. Rust spores overwinter on dead plant material -- leaves, stems, and the remnants of the plant itself. Every fragment left in the garden is a spore bank for next spring. After the first hard frost, remove and destroy every piece of dead hollyhock material. Bag it and put it in the trash. Do not compost it -- home compost piles rarely reach the sustained 140°F needed to kill Puccinia spores. Rake the area clean. If rust was severe, remove the top inch of mulch as well. This single practice can reduce the following year's rust severity by 50% or more.

Remove infected leaves immediately when you first see them, before the spores mature. Weekly inspections of lower leaves from late spring onward, catching spots before they produce pustules, makes an enormous difference. Pull leaves by hand or cut with clean pruners and bag them on the spot -- do not carry dripping leaves through the garden.

Remove the lowest 2-3 leaves in early summer as a preventive measure. These are the leaves closest to soil-borne spores and the first to be infected. Their removal also improves air circulation at the base of the plant.

When Prevention Is Not Enough: Fungicides

Fungicides work best as preventives, applied before infection occurs or at the absolute first sign of orange spots. They cannot cure already-infected tissue -- they only protect surfaces they coat from future infection.

Chlorothalonil (sold as Daconil or Bonide Fung-onil) is the most commonly recommended broad-spectrum option, applied every 7-14 days from when leaves first emerge. Myclobutanil (Immunox) is systemic -- it is absorbed into leaf tissue and is rain-resistant once dry, making it particularly useful in wet climates. Apply every 14 days.

For organic approaches, sulfur-based fungicides applied every 7-10 days offer moderate protection, but do not apply when temperatures exceed 85°F or you will burn the foliage. Neem oil functions better as a deterrent than a treatment, providing modest effectiveness when applied preventively every 7-14 days. Baking soda spray (1 tablespoon baking soda, 1 teaspoon horticultural oil, 1 gallon water) raises leaf surface pH to make conditions less favorable for rust, but it is not a substitute for proper cultural practices in high-pressure zones.

Spray the undersides of leaves, not just the tops -- that is where spores land and where pustules form. Rotate between product types across the season to prevent resistance development. Reapply after rain unless using a systemic.

The Case for Rust-Resistant Species

For growers in zones 6-8 who are tired of the battle, switching species is the most effective long-term solution. Alcea ficifolia (fig-leaf hollyhock) is significantly rust-resistant and provides the full cottage garden vertical drama with warm, luminous flower tones. Alcea rugosa (Russian hollyhock) is nearly immune to rust, full stop. The trade-off is yellow flowers only, but for growers who want the height and the presence without the management burden, A. rugosa is extraordinary. It is particularly useful as the permanent structural backbone of a planting, supplemented by small numbers of A. rosea for color variety where you are willing to accept some rust management.


Planting, Staking, and Season-Long Care

Starting from Seed

Hollyhocks are almost always grown from seed, and the process is simpler than most gardeners expect. Before anything else, soak seeds overnight -- 8 to 12 hours in room-temperature water. The seed coat is hard and soaking softens it, improving germination rates from roughly 60% to above 80%. Some growers lightly nick the seed coat with a nail file before soaking for even faster germination.

Direct sowing is the method that produces the strongest plants. Plant seeds 1/4 inch deep at the permanent planting location -- not a nursery bed, not a temporary spot. The taproot begins growing immediately and does not survive relocation once established. Sow about one week before the last frost date for your zone (mid-April in zone 5; mid-March in zone 7). Thin to 24 inches apart once seedlings have two or three true leaves. Germination takes 10-14 days at soil temperatures between 60°F and 70°F.

Indoor starting is valuable for first-year blooming varieties and in short-season zones 3 and 4. Start 9 weeks before last frost in tall pots -- 4 inches or deeper -- because the taproot needs vertical room from the beginning. Peat pots or soil blocks are ideal since they can be planted directly into the garden, avoiding root disturbance. Harden off for 7-10 days before transplanting.

Summer or fall sowing is the lowest-effort approach and the one that most closely mimics how hollyhocks perpetuate themselves in the wild. Sow seeds in June through August. Seedlings establish their rosettes before winter and bloom the following summer without any indoor starting. This is how self-sown colonies maintain themselves once established.

Staking

Standard-height varieties will need staking, particularly those with large double flowers and in locations with any wind exposure. Install stakes early -- once a spike has bent in a storm, it rarely straightens convincingly.

The simplest approach: plant 6-8 inches from a fence and tie the stalk loosely to the fence with soft cloth strips or garden tape as it grows. A 6-foot bamboo stake driven 12 inches into the soil before the spike emerges works for individual plants in open positions. Tie at two or three points, never tightly. The stalk needs to move slightly with wind -- rigid ties create leverage points for breakage.

Peony cages or grow-through rings placed over the rosette in early spring allow the spike to grow through and support itself. Queeny Purple at 20 inches needs no staking whatsoever -- this is one of its practical virtues.

Fertilization

Hollyhocks are light feeders, and overfeeding is a more common mistake than underfeeding. Rich soil and high-nitrogen fertilizers produce exactly the kind of lush, soft, rapidly-grown foliage that rust settles into most aggressively. The goal is not maximum growth. It is strong growth.

At planting, mix 2-3 inches of compost into the top 12 inches of soil. This is usually sufficient for the entire first year. In the spring of the bloom year, side-dress with compost or apply a balanced granular fertilizer (10-10-10) at half the label rate. An optional light compost top-dress mid-season -- 1 inch, kept 2 inches from the crown -- is the maximum most established hollyhocks need.

Skip fertilizing if your soil is already rich, if you have recently added compost, or if the plant is growing vigorously. These are not plants that respond to pushing. They respond to good siting and appropriate care.

Deadheading and Seed Management

The deadheading decision is a design decision as much as a horticultural one.

If you want the longest possible bloom period, remove spent flowers as they fade, working up the spike. This can extend bloom by one to two weeks by encouraging remaining buds to develop fully.

If you want self-sowing -- and most hollyhock growers do -- allow the bottom flowers on some spikes to mature into the flat, disc-shaped seed pods. When those pods turn papery brown, they split open and release seed. Let it fall naturally and you have the beginning of your self-sustaining colony.

The best practical compromise: deadhead most spikes through the season, but leave two or three plants to set seed fully. You get extended bloom from the deadheaded plants and future seedlings from the ones you leave. After two to three years of this, the colony largely manages itself.

End-of-Season Care

After the last flowers fade, cut flower spikes back to the basal rosette unless you are actively saving seed. Then -- and this is not optional -- remove and destroy every piece of dead hollyhock material from the garden. Stems, leaves, fallen debris, the remnants of second-year plants that have completed their life cycle. Bag it for trash. Rake the area clean. Do not compost any of it if rust was present. If rust was severe, remove the top inch of mulch as well.

Mark the locations of first-year rosettes clearly -- they are low to the ground and easy to accidentally dig up during fall cleanup. In zones 3-5, apply 1-2 inches of mulch over rosettes after the ground begins to freeze. Do not bury the crown. In spring, remove the winter mulch as new growth appears from the center.


The Mistakes That Separate Thriving Hollyhocks From Struggling Ones

Every mistake hollyhock growers make falls into a handful of predictable patterns. Some are decisions made at planting that cannot be undone. Some are seasonal habits that accumulate into a disease-ridden mess by August. Here are the ones that matter most, ranked by how much damage they cause.

Overhead Watering

This is the mistake with the most immediate, visible consequences. Wet foliage is the infection surface for rust. A single overhead watering session in the evening can initiate a rust outbreak that takes weeks of management to contain. In an established planting, overhead watering once a week can collapse a healthy-looking stand into a defoliated disaster within a month. There is no acceptable frequency for overhead watering of hollyhocks. The answer is zero.

Skipping Fall Cleanup

The rust spores overwintering in that pile of spent hollyhock leaves are next year's infection, starting earlier and hitting harder because the spore population is larger. Growers who skip fall cleanup consistently see rust appearing weeks earlier the following season and progressing more severely. Growers who do thorough fall cleanup every single year consistently report that their rust management work through the season is lighter. This is the highest-leverage action in the entire growing calendar. It is also unpleasant in November when you are tired of the garden. Do it anyway.

Spacing Too Closely

The impulse to plant hollyhocks 12 inches apart for a dense, impressive mass is understandable. The result, by August in any humid zone, is a rust-infested thicket where humid, stagnant air holds leaf wetness for hours after rain, spores travel freely between touching leaves, and every plant infects every neighbor within days. The first-year planting looks sparse at 24 inches. The second-year planting looks correct.

Expecting Year-One Flowers

Pulling out first-year rosettes in frustration, then replanting and doing it again, is the hollyhock loop that keeps growers stuck. Understanding the biennial cycle dissolves the frustration entirely. If you genuinely cannot wait a full growing season, start Indian Spring, Spring Celebrities, or Queeny Purple indoors 9-12 weeks before the last frost. These varieties can bloom their first year with enough lead time. But for the classic large-flowered varieties like Chater's Double or Nigra, year two is the destination, and the first-year rosette is the foundation you are building.

Transplanting Established Plants

A first-year rosette with 8-10 large leaves has a taproot that is already 12-18 inches long. Digging it up severs or damages that taproot. Unlike fibrous-rooted plants that regenerate quickly from root disturbance, taprooted plants often cannot recover. The plant dies or fails to thrive. If you must move a hollyhock, do it when the seedling is very small -- fewer than 4 leaves, less than 3-4 inches across -- when the taproot is still short enough to extract intact. For established plants, the answer is always to sow seed or plant a new seedling in the target location rather than trying to move what is already growing.

Planting in Wet or Shaded Sites

These seem like obvious mistakes, but they are surprisingly common because hollyhocks look like tough, informal plants that should handle difficult conditions. They handle poor soil, mild drought, cold winters, and lean fertility without complaint. They do not handle wet soil or significant shade. In wet soil, the taproot rots. In shade, stems become weak and floppy, flowering diminishes, and fungal disease intensifies. Choose the sunniest, best-drained spot you have. The plant will reward you accordingly.


Companion Planting: Hollyhocks in the Garden Picture

Hollyhocks are first and foremost vertical elements, and they are most powerful when placed against something -- a wall, a fence, a building -- that frames them and gives the eye a place to rest. At the back of a border, they anchor the visual hierarchy, and everything in front of them benefits from that height.

The companions that work best share two qualities: they complement the hollyhock's scale without competing with it for attention, and they do not interfere with the air circulation hollyhocks need.

Delphiniums are the classic pairing -- matching vertical drama in complementary blues and purples against the hollyhock's warmer palette. They bloom at similar times and create a back-of-border tapestry that defines the cottage garden aesthetic.

Foxgloves are the other obvious biennial companion -- spires rather than stacked rounds, but sharing the same biennial cycle and the same cottage sensibility. A planting of hollyhocks and foxgloves essentially manages itself once self-sowing is established.

Climbing roses share historical placement against walls and fences with hollyhocks. The combination of climbing rose canes and hollyhock spikes against a warm-colored brick or pale plaster wall is the garden picture that gave the English cottage garden its reputation.

Sweet peas can actually climb hollyhock stalks as a support structure, twining upward and adding their own delicate, fragrant presence among the larger blooms.

At the front of the border, lavender works beautifully as a low mound -- its silver foliage and purple blooms providing strong contrast in color, texture, and scale to the hollyhock's rough leaves and large flowers. The combination has a natural rightness to it.

What zone are you in?

Enter your zip code for frost dates, growing season, and soil type.


Frequently Asked Questions

Why are there no flowers on my hollyhock?

Almost certainly because it is a first-year plant. Hollyhocks are biennials -- the first year produces only a leafy rosette at ground level, with no flowers whatsoever. This is completely normal and means the plant is healthy. Flowers come in the second year. If the plant is definitely in its second year and still not flowering, check for sufficient sunlight (6+ hours daily is required) and confirm it is not in a low spot where water pools.

My hollyhock leaves are covered in orange spots. What is it?

Hollyhock rust -- Puccinia malvacearum. Look at the undersides of the affected leaves for raised orange-yellow pustules; those are the spore-producing structures. Start by removing all infected leaves immediately and bagging them. Switch to drip or base watering if you have been watering overhead. Apply a preventive fungicide (chlorothalonil or myclobutanil) to the remaining healthy foliage, targeting the undersides of leaves. The most important action is fall cleanup -- remove every piece of dead plant material after the growing season to eliminate the overwintering spore reservoir.

Can I move an established hollyhock to a new location?

For all practical purposes, no. Hollyhocks develop a taproot that reaches 12-18 inches deep by the end of the first growing season. Digging it up severs the taproot, and taprooted plants do not recover from this the way fibrous-rooted plants do. The one exception is very young seedlings -- smaller than 4 inches across, with fewer than four leaves -- where the taproot is still short enough to extract intact. For any plant larger than that, plant a new seedling in the target location instead.

Do hollyhocks come back every year?

Technically, most hollyhocks are biennial -- they live for two years, bloom in the second, and then die. But in practice, an established hollyhock planting does come back every year because of prolific self-sowing. Volunteer seedlings appear in spring, some bloom and some form rosettes, and the colony perpetuates itself indefinitely. Alcea rugosa (Russian hollyhock) is an exception -- it behaves as a true perennial in zones 3-5, returning and reblooming for three to five years without needing to self-sow.

What varieties bloom the first year?

Indian Spring, Spring Celebrities, and Queeny Purple can all bloom in their first year, but only when started indoors 9 to 12 weeks before the last frost date. The long indoor starting time gives the plant enough vegetative growth to shift into flowering mode before the growing season ends. Without that early start, they will behave like any other biennial.

How do I get hollyhocks to self-sow?

Allow the bottom flowers on at least 2-3 spikes to mature into seed pods. The pods turn papery brown and split open when seeds are ready. Let them drop naturally. Keep mulch to 1 inch or less within 2-3 feet of the plant -- seeds need contact with the soil to germinate, and thick mulch prevents this. Do not till or rake aggressively in the area where seeds have dropped. In spring, thin volunteer seedlings to 24 inches apart, keeping the strongest ones and transplanting small extras to new locations.

Are hollyhocks deer-resistant?

Hollyhocks are not particularly deer-resistant. Deer browse the foliage and flowers, particularly in early summer when stalks are soft and growing. In areas with significant deer pressure, physical protection during the establishment phase and bloom year -- or companion plantings that deter deer -- will be necessary.


The Bottom Line

Hollyhocks are not difficult plants. They are specific plants, with a distinct personality and a handful of genuine requirements. Meet those requirements and you will have one of the most dramatic, romantic, and surprisingly self-sufficient plants in the garden -- a colony that expands without replanting, rises 7 feet behind a fence in mid-summer, and stops visitors mid-step.

Get the placement right first. Full sun, good drainage, wind protection from a wall or fence. Plant at least 24 inches apart. Water at the soil, never at the foliage. Clean up every piece of dead material in the fall without exception. Understand that the first year's rosette is a promise, not a disappointment.

In humid zones 6-8, take the rust problem seriously and let it inform your variety selection. Alcea rugosa and Alcea ficifolia give you the full cottage garden vertical drama without the constant Puccinia management. In zones 3-5, you have a wider range of choices and fewer disease pressures, and the classic Alcea rosea cultivars -- Chater's Double, Nigra, Halo Series -- are fully accessible.

Plant them this year. They will reward you next summer with something extraordinary.

Research for this guide was synthesized from extension service sources and cultivar trial data across USDA zones 3 through 8, with particular reference to disease management guidance for Puccinia malvacearum (hollyhock rust), biennial life cycle documentation, and rust-resistant species trials comparing Alcea rosea, Alcea ficifolia, and Alcea rugosa.

Where Hollyhocks Grows Best

Hollyhocks thrives in USDA Zones 3, 4, 5. Explore each zone's complete guide for growing tips, companion plants, and seasonal advice.

Also possible in: Zone 6, Zone 7 (challenging but possible with the right conditions).

Not sure of your zone? Look it up by zip code →