Vegetables

Every Pepper Problem Traces Back to May: A Grower's Guide to Getting It Right

James Calloway

James Calloway

Vegetable & Edibles Specialist · Updated April 2026

How to grow peppers — vintage botanical illustration showing the plant in detail

Peppers at a Glance

Sun

Sun

6-8 hours full sun

Soil pH

Soil pH

6.0-6.8

Water

Water

1-2 inches per week

Spacing

Spacing

18-24"

Days to harvest

Days to Harvest

60-120+ days from transplant

Height

Height

18-36 inches depending on variety

Soil type

Soil

Well-drained loam or sandy loam

Lifespan

Lifespan

annual

Get your personalized growing data

Enter your zip code for frost dates, growing season, and soil type.

I have watched more pepper transplants sit in cold soil doing absolutely nothing than I care to count. The gardener is convinced something is wrong with the plant. The plant is convinced something is wrong with the soil temperature. The plant is right.

Peppers are heat crops. Not warm-weather crops — heat crops. They want 65°F soil before their roots will even bother growing. They want nights above 55°F before they will set fruit. They want 8 hours of direct sun minimum. Give them that and a single jalapeño plant in a 5-gallon container will bury you in peppers from July to frost. A well-managed bell pepper plant yields several pounds per season. An overwintered habanero in its second year can triple what it produced as a seedling.

But plant them two weeks too early into 50°F soil? You get a stunted, purple-tinged transplant that never catches up. That is the story of most failed pepper gardens, and it plays out in every zone from Minnesota to Georgia.

Then there are the superhots — the Carolina Reaper at 2.2 million Scoville heat units, the Ghost Pepper above a million. These demand 150 to 200 days from seed to ripe fruit. They will test your patience during germination (two weeks of nothing is normal) and reward it with harvests that last through fall. They are growable in zone 5 with the right setup. They are spectacular in zone 8.

This guide covers the full range. Sweet bells to superhots. Short-season zones where Wall-O-Waters are mandatory equipment, to southern zones where the challenge is dodging summer heat, not chasing it.


Quick Answer: Pepper Growing at a Glance

USDA Zones: 3 through 11 (with the right variety and start date)

Sun: 6–8 hours minimum; 8–10 hours ideal (University of Maryland)

Soil pH: 6.0–6.8

Soil Temperature at Transplant: 60°F minimum measured 2 inches deep; 65°F preferred

Spacing: 18–24 inches between plants; rows 24–36 inches apart

Water: 1–2 inches per week; consistent moisture is more important than total volume

Fertilizer: Balanced (10-10-10) early season; switch to lower-nitrogen (5-10-10) once flowers appear

Days to Maturity: 60–75 days for short-season varieties; 90–120 days for superhots (from transplant)

Germination Temperature: 80–85°F soil temperature is optimal; a thermostat-controlled heat mat is required equipment

Fruit Set Window: 65–85°F daytime, 60–70°F nighttime; failure occurs below 60°F and above 90–95°F

Container Minimum: 5-gallon per plant

Seed Start: 8–10 weeks before last frost (standard); 12–16 weeks (superhots)


The Cold Soil Problem (Why Your Transplants Sit There Doing Nothing)

Before anything else in this guide matters, you need to understand this one thing.

Peppers require soil at 60°F minimum — measured 2 inches deep — before transplanting. Not air temperature. Soil temperature. These are not the same number, and they are not close to the same number in spring.

Here is what happens when you ignore this. You transplant in late April because the last frost date has passed and daytime air is 65°F. The soil is 50°F. The plant does not die — it just stops. Root function is directly suppressed by cold soil. Foliage may turn purple-tinged. No new growth. No flowers. The plant is alive but essentially paused, and it never fully catches up to the potential it would have reached had you waited two more weeks for the soil to warm.

The fix is simple: buy a soil thermometer. They cost less than the transplant you will kill without one. Insert it 2 inches deep and read the actual number. If it is below 60°F — wait. If you need to accelerate things, lay black plastic mulch over the planting area 2 to 3 weeks before your target transplant date. It warms soil 8 to 10°F faster than bare ground. That is often the difference between transplanting on schedule and having to wait another two weeks in a short-season zone.

West Virginia University's extension recommends a minimum soil temperature of 65°F at transplant, not just 60°F. I think they are right. The WVU recommendation reflects what happens in actual practice — 60°F is the survival floor, not the optimal threshold.

For zones 3 through 5, Wall-O-Waters (water-filled plastic teepees) change the equation entirely. They create a microclimate 10 to 15°F warmer than ambient, allowing transplanting 3 to 4 weeks before the last frost date. That is not a small advantage in a zone with 90 to 130 frost-free days. It can be the difference between harvesting mature peppers and watching green fruit on the vine when October frost arrives.

The cold soil mistake is also the most invisible mistake. It doesn't kill your plant dramatically. It just quietly costs you three to four weeks of growth right at the beginning of the season, when every day counts.


Best Pepper Varieties by Zone

Variety selection for peppers is not primarily about flavor preference. It is about math. You need a variety whose days-to-maturity number fits inside your frost-free window — with margin. Get this wrong and you will grow a gorgeous, healthy plant that never produces ripe fruit before frost ends the season.

One critical clarification first: "days to maturity" on seed packets counts from transplant, not from seed start. A pepper labeled 75 days requires 8 to 10 weeks of indoor growing before it ever goes in the ground, plus 75 days outdoors after transplanting. Total seed-to-harvest time: 130 to 145 days. For superhots needing 120-plus days from transplant, total time exceeds 180 days. This has enormous implications for which zones can grow which peppers — and when seeds need to be started.

What zone are you in?

Enter your zip code for frost dates, growing season, and soil type.

Short-Season Zones (3–5): Work With What You Have

If you are in zone 3 or 4 — northern Minnesota, the northern plains, the Canadian border — you have 90 to 130 frost-free days. That is a constraint, not a death sentence. But it means every variety choice matters and season extension tools are not optional.

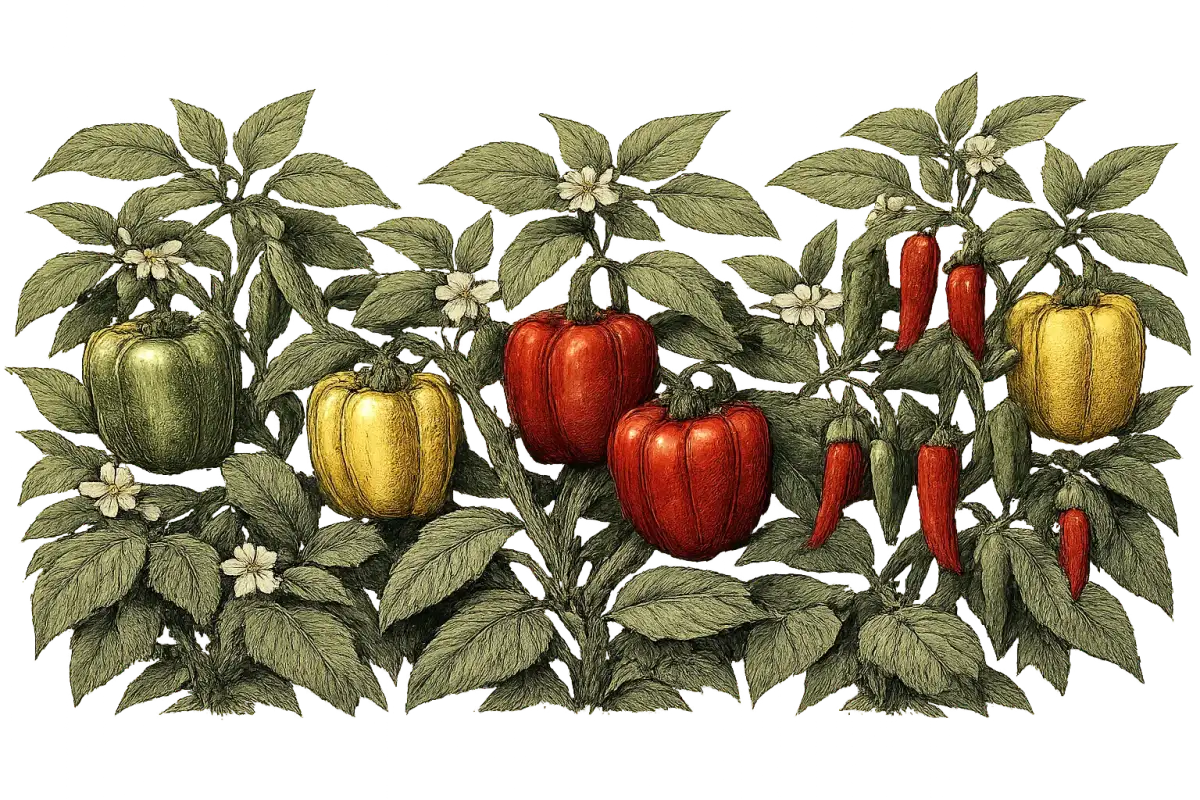
Early Jalapeño at 60 to 65 days from transplant is the workhorse of the northern garden. It is the earliest-maturing jalapeño available and it reliably produces in conditions that would leave a standard-season variety still green when the frost hits. Pair it with Hungarian Yellow Wax at 65 days — an excellent northern performer with mild to medium heat that produces heavily on compact plants.

For sweet peppers in zones 3 to 5, Gypsy (an All-America Selections winner at 60 to 65 days) is the most reliable early choice we know of. It is thin-walled, sweet, and productive, and it produces where bells struggle. King of the North at 68 days was specifically bred for cold climates and is the go-to bell for northern gardeners who want a traditional blocky fruit. Lunchbox mini sweets at 60 to 75 days are compact and prolific — better suited to short seasons than full-size bells.

The University of Minnesota Extension makes an important point about this zone: smaller-fruited varieties like banana peppers, Hungarian wax, and cayenne tolerate both cool and hot temperature swings better than large-fruited bell peppers. In zones 3 to 5, bells carry real risk of coming up short on season. A fully loaded Banana pepper plant producing all summer is more useful than a bell plant with unripe fruit when October arrives.

In zone 5 — Chicago, Denver, northern Missouri — you have 130 to 150 frost-free days and more options open up. Most varieties under 90 days work reliably. Cayenne at 70 to 75 days is excellent here. Serrano at 75 to 80 days is achievable. Carmen, the Italian frying pepper and AAS winner at 75 days, produces exceptional flavor and works well in this zone.

Superhots in zone 5 are possible, but only with a January seed start, Wall-O-Waters at transplant, and black plastic mulch. It is marginal. If you are determined, Ghost Pepper is a better choice than Carolina Reaper here — ghost pepper plants are larger, more prolific, and while the seed-to-harvest timeline is similar (160 to 200 days versus 150 to 180), the ghost pepper typically delivers more fruit by weight.

Standard Zones (6–7): Wide Open

Zone 6 gives you 150 to 180 frost-free days. Habaneros mature reliably. Most hot peppers are achievable. Superhots are possible with an early January seed start. This is where pepper growing gets genuinely comfortable.

For bells in zone 6, California Wonder at 75 to 80 days is the classic. Big Bertha produces extra-large fruit at 72 to 80 days. Red Knight is an early red bell at 72 to 76 days. A timing note worth knowing: bell peppers reach mature green stage at 70 to 80 days, but full red, orange, or yellow color requires an additional 2 to 3 weeks on the plant. In zone 6, you may harvest a lot of green bells and relatively few fully colored ones. That is not a failure — green bells are still excellent. It is just the zone reality.

For hot peppers in zone 6, Poblano and Anaheim/Hatch types at 75 to 80 days are fully achievable. Jimmy Nardello at 80 to 90 days is an Italian frying heirloom with exceptional sweetness that does well in the longer end of zone 6 seasons.

Zone 7 — Virginia, Oklahoma, northern Texas — is where the full range opens up. Habanero at 90 to 100 days matures reliably. Scotch Bonnet at 90 to 100 days is achievable. Datil, the Florida heirloom with sweet, fruity heat at 90 to 100 days, is an underrated choice for this zone. Seeds in zone 7 go in early January for an early to mid-April transplant. The New Mexico specialty types — NuMex Heritage Big Jim, NuMex Conquistador, NuMex Sandia Select — are excellent choices in zone 7 southwestern gardens, as recommended by New Mexico State University. These Hatch/Anaheim-lineage varieties are 4 to 10 inches long and are the basis of traditional ristras.

Hot-Climate Zones (8–10): Manage the Summer Gap

Zone 8 and above have the opposite problem from cold zones. The season is long — 210 to 300-plus frost-free days. Superhots are routine. But zones 9 and 10 have a mid-summer production gap that catches gardeners off guard every year.

When daytime temperatures consistently exceed 95°F, pepper flowers drop before setting fruit. Above roughly 100°F, pollen becomes non-viable regardless of whether the flower drops. The plant is not sick. It is biologically prevented from setting fruit in extreme heat. Fruit set occurs reliably only between 65 and 85°F daytime and 60 to 70°F nighttime. In Phoenix, Houston, or Miami in July, you are outside that window.

The strategy: plan for a fall harvest. In zone 9, start a second crop in June or July, transplant in August, and harvest through November and December when temperatures moderate. Zone 9 and 10 growers commonly report that their fall harvests are the most productive period of the entire year.

For zones 8 through 10, shade cloth is worth understanding. A 4-year study by scientist Emmalea Ernest at the University of Delaware found that 30% black shade cloth tripled marketable bell pepper yield compared to unshaded plants. The mechanism is not adding more peppers — it is protecting the ones that set. Shade cloth reduced maximum daily canopy temperatures by 8°F, which is enough to keep plants inside the fruit-set window during afternoon heat spikes. It also dramatically reduced sunscald losses. The specific recommendation: black 30% knitted shade cloth, applied after transplanting in early June and maintained through July and early August.

Quick Reference Table: Top Picks by Zone Group

Zone GroupTop 3 VarietiesTypeWhy
3–4Early Jalapeño, Gypsy, Hungarian Yellow WaxC. annuumEarliest-maturing; proven northern performers
5–6Carmen, Cayenne, SerranoC. annuum70–80 days; wide range of types mature reliably
7Habanero, NuMex Heritage Big Jim, Jimmy NardelloMixedFull range matures; long enough for C. chinense
8–9Ghost Pepper, Datil, HatchMixedLong season; plan fall harvest for zones 9–10
10–11Carolina Reaper, Scotch Bonnet, any superhotC. chinenseMaximum season; perennial habit possible outdoors

Starting From Seed: The Heat Mat Is Not Optional

Most gardeners underestimate how important soil temperature is for pepper germination. Room temperature is not warm enough. A shelf in a 70°F house is not warm enough. Peppers evolved in tropical environments, and cold soil produces slow, erratic germination — or no germination at all.

Here is the germination temperature table that should be posted above every seed-starting setup in the country:

At 65°F, germination takes 3 to 4 weeks with low, erratic success. At 75°F, 10 to 14 days with good success. At 80 to 85°F — the optimal range — 7 to 10 days with excellent success rates. That is not a small difference. It is the difference between seeds sprouting in under two weeks and seeds sitting in cold medium for a month while you wonder what went wrong.

A seedling heat mat with a thermostat controller — not just any heat mat, but one with a thermostat and a probe you can actually put in the soil — is the single most important piece of equipment for starting peppers. Set it to 80°F. Put the temperature probe inside the soil, not on the mat surface or in the room air. Without a thermostat, mats can overshoot and cook seeds.

Timing: Count Backwards From Last Frost

Standard varieties (bell peppers, jalapeños, cayenne, most hot peppers): start 8 to 10 weeks before your last frost date.

Superhots (ghost pepper, Carolina Reaper, Moruga Scorpion, 7 Pot Douglah): start 12 to 16 weeks before last frost. Some growers go 14 weeks specifically for Reapers. These are not conservative estimates — they are necessary. Capsicum chinense varieties take 3 to 4 weeks to germinate even at 80 to 85°F. Do not discard superhot seeds at two weeks. Three to four weeks of nothing is completely normal. The most common superhot germination mistake is giving up too early.

The Process

Use seed-starting mix only — not potting soil, not garden soil. Seed-starting mix is sterile, fine-textured, and contains no fertilizer (which burns delicate seedlings). Pre-moisten it so it clumps when squeezed but does not drip.

Plant seeds 1/8 to 1/4 inch deep, one to two seeds per cell. Cover with humidity dome. Set on heat mat at 80°F. Seeds do not need light during germination — darkness is fine. Spritz daily to maintain surface moisture. Remove the dome for 15 to 30 minutes each day for air circulation.

The moment green cotyledons (seed leaves) emerge: remove the humidity dome immediately and provide strong light. This step is not optional and the timing matters. Without adequate light within hours of sprouting, seedlings stretch toward any available source and go leggy within days. Use a full-spectrum LED or T5 fluorescent grow light, 4 to 6 inches above seedling tops, running 14 to 16 hours per day. A south-facing window is almost never sufficient in late winter. Grow lights are considered essential equipment, not a luxury.

Once seedlings emerge, reduce the heat mat temperature. Optimal post-germination temperatures are 70 to 75°F daytime and 60 to 65°F nighttime. These lower temperatures promote stockier, stronger growth. Run a small fan on low speed nearby — air movement strengthens stems and prevents mold.


Transplanting Without Killing Everything You Spent 8 Weeks Growing

You have grown seedlings for 8 to 10 weeks. They look healthy. You want them in the ground. This is where a lot of those weeks get wasted.

Hardening off is not optional. Indoor seedlings grown under gentle grow lights are completely unprepared for outdoor conditions — intense UV radiation, wind, and temperature swings are all genuine shocks to an indoor-adapted plant. Skip this step and you will get white bleached patches on leaves (sunburn), wind-snapped stems, and plants that stall for two weeks recovering from the transition.

The process takes 7 to 14 days and follows three phases: 1 to 2 hours in dappled shade for the first few days, 4 to 6 hours with some morning sun in the middle phase, and a full day outside with direct sun by the end. Leave plants outside overnight only when temperatures are reliably above 55°F. If you see purple-tinged foliage (cold stress) or bleached leaves (sunburn), retreat one phase and slow down.

At transplant, plant at the same depth as the pot. Peppers are not tomatoes — they do not benefit from deep planting and can suffer stem rot if the crown is buried. Space plants 18 to 24 inches apart in rows 24 to 36 inches apart. Remove any early flowers from transplants at planting time. Yes, really. Redirecting energy from fruit to root establishment in the first weeks produces a stronger plant and better long-term yield.


Feeding, Watering, and the Blossom-End Rot Trap

Watering: Consistency Beats Volume

Target 1 to 2 inches of water per week for in-ground plants during active growth. Sandy soils need the upper end; heavier soils need less frequent application. The single most important watering principle is not how much — it is evenness over time.

Drought followed by heavy watering causes blossom drop during flowering, blossom-end rot during fruit development, and poorly formed fruit. These are not separate problems with separate causes. They are all the same problem: inconsistent moisture.

Drip irrigation is the right tool for peppers. It delivers water at the soil surface rather than on foliage (wet leaves promote bacterial leaf spot and anthracnose), maintains consistent soil moisture, and prevents the watering spikes that cause BER. If you have more than a few plants, drip irrigation pays for itself in reduced disease and improved fruit quality within a single season.

Apply 3 to 4 inches of straw, grass clippings, or wood chip mulch around plants after soil has warmed above 75°F. Mulch reduces watering frequency, moderates soil temperature, prevents disease-spreading soil splash, and suppresses weeds. Do not apply organic mulch too early — it insulates cold soil and delays spring warming. Wait for the soil to warm first.

Fertilizing: Less Nitrogen Than You Think

Incorporate 2 to 4 inches of composted organic matter into the top 6 inches of soil before planting. Soil test first; if phosphorus is already high in your garden (common in long-cultivated beds), use low-phosphorus or no-phosphorus fertilizers.

After transplanting, side-dress with nitrogen at 4 weeks and again at 8 weeks — roughly 1/4 tablespoon of ammonium sulfate (21-0-0) per plant, placed 6 inches from the stem. Clemson Extension recommends calcium nitrate (15.5-0-0) at 5 pounds per 1,000 square feet as an alternative that provides both nitrogen and calcium simultaneously, which addresses BER in one step.

The critical shift: once flowers appear, reduce nitrogen relative to phosphorus and potassium. A balanced 10-10-10 works through early season; switch to a lower-nitrogen formula like 5-10-10 or a tomato/pepper blend once flowers open. Excessive nitrogen during the fruiting phase produces impressive foliage and no fruit. The plant looks great. It produces nothing useful.

Blossom-End Rot: The Fix Is Simpler Than the Explanation

Blossom-end rot — that dark, sunken, leathery patch on the bottom of developing fruit — is a calcium deficiency at the fruit tissue. But in nearly every case, the soil has adequate calcium. The problem is that calcium moves through the plant via water transpiration, and inconsistent watering disrupts calcium transport to the fastest-growing tissues: developing fruit.

According to University of Georgia extension research on BER, the fix is almost never soil calcium amendment. It is irrigation consistency. Drip irrigation plus mulch is the most reliable system. If a soil test genuinely confirms low calcium, add lime (which also raises pH) or gypsum (adds calcium without pH change). Foliar calcium sprays have variable effectiveness and treat the symptom rather than the cause.

Remove affected fruit promptly. Leaving BER fruit on the plant wastes energy and can attract secondary disease.


Shade Cloth, Sunscald, and Growing Peppers in the Heat

Here is a research result that most gardeners have never heard of and which changes the math entirely for hot-climate growing.

A 4-year study conducted by Emmalea Ernest at the University of Delaware Cooperative Extension, running from 2018 through 2021, tested different shade cloth colors and densities on bell pepper yield. The headline finding: 30% black shade cloth tripled marketable bell pepper yield compared to unshaded plants.

That is not a typo. Tripled. Not a modest improvement — a 3x increase in sellable fruit from a piece of mesh fabric.

The mechanism matters. Shade cloth did not increase the number of peppers produced. It increased fruit size, reduced sunscald losses, and improved overall fruit quality. The maximum daily canopy temperature under 30% black shade cloth was 8°F lower than unshaded plants. Average daily temperature was 2°F cooler. That 8°F reduction in peak temperature is what keeps plants inside the fruit-set window during afternoon heat spikes — the spikes that cause blossom drop and pollen failure above 95°F.

All tested shade cloth colors improved yield over no shade. Black 30% was significantly higher than white 30%, red 30%, and aluminized 30%. The study also found no increase in disease incidence under shade cloth across all four years — which addresses the common concern that reduced airflow promotes fungal problems.

One variety note: Carmen (the Italian frying pepper) did not show a significant yield increase under shade cloth, suggesting greater natural heat tolerance in that type compared to blocky bell peppers.

Install 30% black knitted shade cloth by draping it over the pepper stakes already supporting the plants. Anchor to the ground with landscape staples. Apply immediately after transplanting in early June; maintain through July and early August. Lift it back for harvest — the loose installation makes this easy.

If you are growing bells in zones 7 through 10 and not using shade cloth, you are leaving yield on the ground.

What zone are you in?

Enter your zip code for frost dates, growing season, and soil type.


Superhots: A Different Plant Entirely

The Carolina Reaper. The Ghost Pepper. The Trinidad Moruga Scorpion. The 7 Pot Douglah. These are not just hotter versions of a jalapeño. They are a different species — Capsicum chinense — with different germination requirements, longer seasons, and more cold sensitivity than the C. annuum group that covers most common peppers.

Here is what you are working with:

Carolina Reaper: 1.4 to 2.2 million Scoville heat units. The current Guinness World Record holder. Created by Ed Curlin of The PuckerButt Pepper Company via a cross of Pakistani Naga and Caribbean red habanero. Heavily wrinkled red pods with a characteristic stinger tail. 90 to 120 days from transplant, 150 to 180 days seed to harvest. 3 to 5 feet tall, bushy.

Ghost Pepper (Bhut Jolokia): 800,000 to 1,041,427 SHU. The first pepper to exceed 1 million SHU. A natural interspecific hybrid from northeast India. 100 to 120 days from transplant. Here is the important distinction: ghost pepper plants are larger and more prolific than Carolina Reaper plants. More fruit by weight. If maximum production alongside high heat is your goal, ghost peppers often deliver a better result than Reapers.

Trinidad Moruga Scorpion: 1.2 to 2.0 million SHU. 7 Pot Douglah: 923,000 to 1.8 million SHU. Both in the 90 to 120 day range from transplant.

Heat Is a Stress Response

The critical insight from New Mexico State University research: genetics sets the ceiling, environment determines how close you get. Drought stress, heat exposure, and lean soil all trigger the plant to produce more capsaicin as a defensive response. This works at every heat level — a naturally mild variety under stress can significantly exceed its normal heat range. A jalapeño grown under water restriction and heat stress will be measurably hotter than a jalapeño grown in optimal conditions.

For maximum heat from superhots: water normally through vegetative growth and early flowering, then begin reducing water once fruit has set. Allow plants to show slight afternoon leaf droop before watering. Do not allow severe or repeated wilting — that kills plants. The tradeoff is explicit: water-stressed plants produce hotter but fewer fruits. Decide upfront whether maximum heat or maximum yield is the goal. They require opposite strategies.

Harvest at full ripeness. Capsaicinoid production peaks at full maturity. Green or partially colored superhots are significantly less hot than fully ripened fruit.

Always wear gloves. Capsaicin is oil-soluble; water alone does not remove it. Use dish soap to wash hands after handling. Work in a ventilated area when cutting or dehydrating — capsaicin vapor from a dehydrator can cause genuine airway irritation.

Overwintering: A Second-Year Plant Is a Different Animal

Peppers are perennials in their native tropical habitat. In temperate climates, they can be kept alive through winter and produce for 3 to 5 years. Second-year plants have established root systems that drive faster spring regrowth, earlier fruiting, and better total yield than first-year seedlings. An overwintered Anaheim can yield 20 to 30 peppers per plant in its second season.

The process: when overnight temperatures dip into the mid-40s°F, harvest all remaining fruit, prune plants aggressively to 6 to 8 inches tall, strip every leaf (this eliminates pest hiding spots and forces dormancy), remove from pot or ground, strip all soil from the root ball, trim roots to size, and repot into fresh potting soil in a clean 1 to 3-gallon container.

Store at 55 to 65°F in a garage, basement, or mudroom. Ambient light from a window is sufficient — full grow lights are not needed during dormancy. Water minimally. Check for aphids, spider mites, and fungus gnats weekly; indoor plants lack natural predators and pest populations explode without intervention.

In spring, 4 to 6 weeks before planned outdoor date, move to warmer conditions, increase light, resume regular watering, and begin light fertilization. Harden off exactly as you would a first-year transplant.

Containers make overwintering dramatically easier. There is no digging, no root disruption, and no transplant shock. This is one of the best arguments for container growing superhots specifically.


Container Growing: Real Peppers in Small Spaces

Container peppers are not a compromise. They are often the better choice. Container soil warms faster than ground soil in spring, enabling earlier planting. You have complete control over soil quality. You can move plants to follow the sun, shelter from unexpected frost, or bring indoors for overwintering. And on a balcony or patio with no ground access, containers are the only option.

The standard minimum is 5 gallons per plant. This is not a suggestion — it is the minimum root volume required to support a productive full-size pepper. The one exception: very compact ornamental varieties and mini peppers can succeed in 3-gallon containers. Superhots (ghost pepper, Carolina Reaper) benefit from 10-gallon containers for maximum yield.

Never use garden soil in containers. Garden soil compacts into a brick-like mass in containers within weeks. Drainage fails. Roots suffocate. Use an all-purpose potting mix with 4 to 6 cups of compost and 1 cup of worm castings per 5-gallon bucket. This creates a loose, well-draining, moderately fertile medium.

Drill 4 to 6 holes in the bottom of plastic buckets using a 1/2 to 3/4 inch drill bit. Add 4 more holes around the lower sides, 1 inch from the bottom. Place a 3-inch base layer of gravel, pebbles, or coarse perlite before adding soil. Root rot is the number one killer of container peppers; proper drainage is not optional.

Container peppers are heavy feeders. Nutrients leach out with every watering. Feed every 2 weeks during the growing season with compost tea, worm casting tea, or dilute organic liquid fertilizer at half strength. Balanced formula through early season; switch to higher phosphorus and potassium (5-10-10 or tomato/pepper blend) once flowers appear.

In peak summer heat, 5-gallon containers may need daily watering. Check soil moisture by inserting a finger 3 inches deep — water only when dry at that depth. Follow the soil, not the calendar. Water deeply until liquid runs freely from drainage holes to ensure the full root ball is moistened.

In zones 9 through 10, dark-colored containers can overheat the root zone above 95°F. Use light-colored containers, wrap in burlap, or shade the container itself while keeping the plant in full sun. Fabric grow bags sidestep this problem entirely while also providing better root aeration through air pruning — roots that reach the fabric surface are naturally pruned back, promoting dense fibrous root growth rather than circling.


The Mistakes That Cost You the Most Yield

Ranked by how frequently they cause problems, based on diagnostic guidance from extension services across the country.

Mistake 1: Cold Soil at Transplant

Already covered at length, but it bears repeating in this list because it is the most common and most invisible mistake. A plant in 50°F soil on a 65°F day looks fine. It is not fine. It is stalled, and it will not fully recover the season length it lost. Use a soil thermometer. Use black plastic mulch. Use Wall-O-Waters if you are in zones 3 through 5. The delay of two weeks into warm soil beats an on-schedule transplant into cold soil every time.

Mistake 2: Inconsistent Watering

This one error causes three separate problems: blossom drop, blossom-end rot, and small poorly formed fruit. All three have the same root cause — drought followed by heavy watering rather than even moisture over time. The fix is drip irrigation plus mulch. If you are hand-watering irregular amounts on an irregular schedule, blossom-end rot is almost inevitable during fruit development.

Mistake 3: Wrong Variety for the Season

A 120-day pepper in a 100-day growing season cannot succeed. This is not a matter of good technique or aggressive season extension — the math simply doesn't work. Count your frost-free days, subtract 8 weeks for indoor growing time to get your effective outdoor window, and choose varieties with days-to-maturity comfortably below that number. "Comfortably" means with 2 to 3 weeks of margin, not right at the edge.

Mistake 4: Too Much Nitrogen After Flowering

The plant looks excellent — large, lush, deep green foliage. But it produces few or no flowers, or flowers drop without setting fruit. Nitrogen drives vegetative growth. During the fruiting phase, excess nitrogen tells the plant to keep growing leaves rather than producing fruit. Switch to a lower-nitrogen, higher-phosphorus/potassium formula once flowers appear. Reduce fertilization frequency after fruit set.

Mistake 5: Skipping Hardening Off

You spent 8 to 10 weeks growing seedlings. Then you put them directly outside into full sun, and they get sunburned and wind-stressed and stall for two weeks recovering. The 7 to 14 day hardening-off process is not optional, and it cannot be rushed. Seedlings raised under grow lights are genuinely unprepared for outdoor UV intensity and wind. Start in dappled shade for 1 to 2 hours and work up gradually. There are no shortcuts here.

Mistake 6: Letting Blossom Drop Panic You in Hot Weather

Flowers appear and fall off during peak summer in zones 8 through 10. The plant looks fine otherwise. Gardeners assume something is wrong, add fertilizer, adjust watering, try various interventions — none of which help. The cause is temperature: daytime above 90 to 95°F causes flowers to abort; pollen becomes non-viable above roughly 100°F. The plant is not sick. It is waiting for acceptable temperatures. Accept the mid-summer gap, keep the plant healthy, and it will resume fruiting in fall. Zone 9 to 10 fall harvests are often the most productive of the year.

Mistake 7: Planting the Same Spot Year After Year

Rotating peppers (and all solanaceous crops — tomatoes, eggplant, potatoes, tomatillos) to a new location every 3 to 4 years breaks pest and disease cycles. Phytophthora oospores survive in soil for over 10 years. Bacterial leaf spot, Verticillium, and root-knot nematodes build up with repeated plantings. Rotating to unrelated crops — corn, squash, legumes — is the only effective management tool, because rotating among solanaceous crops provides no protection at all.

What zone are you in?

Enter your zip code for frost dates, growing season, and soil type.


Frequently Asked Questions

What Is the Easiest Pepper to Grow for Beginners?

Jalapeño — specifically Early Jalapeño for zones 3 through 5. It is compact, prolific, tolerates a wide range of conditions, matures in 60 to 65 days from transplant, and is forgiving of minor errors in watering and fertilization. Banana pepper and Hungarian Yellow Wax are close seconds: both are early, productive, and tolerant of temperature fluctuations in ways that large-fruited bells are not. If you want sweet peppers and live in a short-season zone, start with these rather than blocky bells.

Can I Grow Superhots in Zone 5?

Yes, but it requires planning. You need a January seed start (12 to 14 weeks before last frost), Wall-O-Waters at transplant, black plastic mulch, and ideally a south-facing protected location. Ghost Pepper is often the better choice over Carolina Reaper in zone 5 because ghost pepper plants are larger, more prolific, and more forgiving of marginal conditions. Be prepared for a late season harvest — sometimes October. The margin for error is thin.

Why Are My Peppers Flowering But Not Setting Fruit?

Two possible causes. First, temperature: fruit set fails when daytime temperatures exceed 90 to 95°F or when nighttime temperatures drop below 60°F. Check your temperatures before assuming a nutrient or pest problem. Second, excess nitrogen: too much nitrogen during the fruiting phase drives vegetative growth at the expense of fruit. Switch to a lower-nitrogen formula (5-10-10) once flowers appear and reduce fertilization frequency after fruit set begins.

How Do I Get Bell Peppers to Turn Red Instead of Staying Green?

Wait longer. Bell peppers reach mature green at 70 to 80 days from transplant. Full red (or orange or yellow) color development requires an additional 2 to 3 weeks on the plant. In zones 3 to 6, frost sometimes arrives before that color change completes — in which case, green harvest is the correct and reasonable outcome. In zones 7 and above, full color is reliably achievable with varieties like Red Knight and Big Bertha. Green peppers are fully ripe; the color difference is aesthetic, not a sign of underripe fruit.

What Container Size Do I Need for Peppers?

5 gallons per plant, minimum. This is not conservative — it is the actual minimum root volume for a productive plant. Compact varieties (jalapeños, banana peppers, ornamentals) will succeed in 5-gallon containers. Poblano and Habanero benefit from 10-gallon containers. Superhots (Ghost Pepper, Carolina Reaper) need 5-gallon minimum and will produce more with 10 gallons. One plant per container regardless of container size. Overcrowding causes root competition, reduced yields, and increased disease pressure.

Can I Overwinter Pepper Plants?

Yes. Peppers are tropical perennials and can survive 3 to 5 years with proper overwintering. The process involves hard pruning to 6 to 8 inches, stripping all leaves, bare-rooting, repotting into fresh soil, and storing at 55 to 65°F with minimal water and ambient light. Second-year plants produce earlier and often more heavily than first-year transplants. Containers make this dramatically easier since there is no digging or root disruption. Capsicum chinense varieties (habaneros, superhots) are particularly resilient through overwintering.


The Bottom Line

Peppers are not difficult. They are specific. Get the soil temperature right at transplant, match the variety to your frost-free days, water consistently, and back off the nitrogen when flowers appear. Do those four things and you will produce more peppers than you planned for.

The short-season zones are not locked out — they just require earlier seed starts, season extension tools, and early-maturing varieties. The hot-climate zones have the summer gap to manage, not to panic about. And superhots, which look intimidating on paper, are fully achievable for any gardener willing to start seeds in January and wait out 3 to 4 weeks of apparent inactivity during germination.

One plant will give you dozens of fruits. A few containers on a balcony will keep a household in fresh peppers for months. An overwintered habanero in its second year will produce more than you expected when you planted the first one.

Start with the right variety for your zone. Buy a soil thermometer. Don't transplant into cold soil.

Everything else follows from there.

Research for this guide was synthesized from extension service publications including Clemson University Cooperative Extension, Ohio State University Extension, University of Minnesota Extension, University of Maryland Extension, West Virginia University Extension, Utah State University Extension, New Mexico State University Extension, University of Georgia Extension, University of Florida IFAS Extension, University of Delaware Cooperative Extension, and University of California Cooperative Extension, as well as Penn State Extension and published cultivar trial data.

Where Peppers Grows Best

Peppers thrives in USDA Zones 6, 7, 8, 9. Explore each zone's complete guide for growing tips, companion plants, and seasonal advice.

Also possible in: Zone 5, Zone 10 (challenging but possible with the right conditions).

Not sure of your zone? Look it up by zip code →