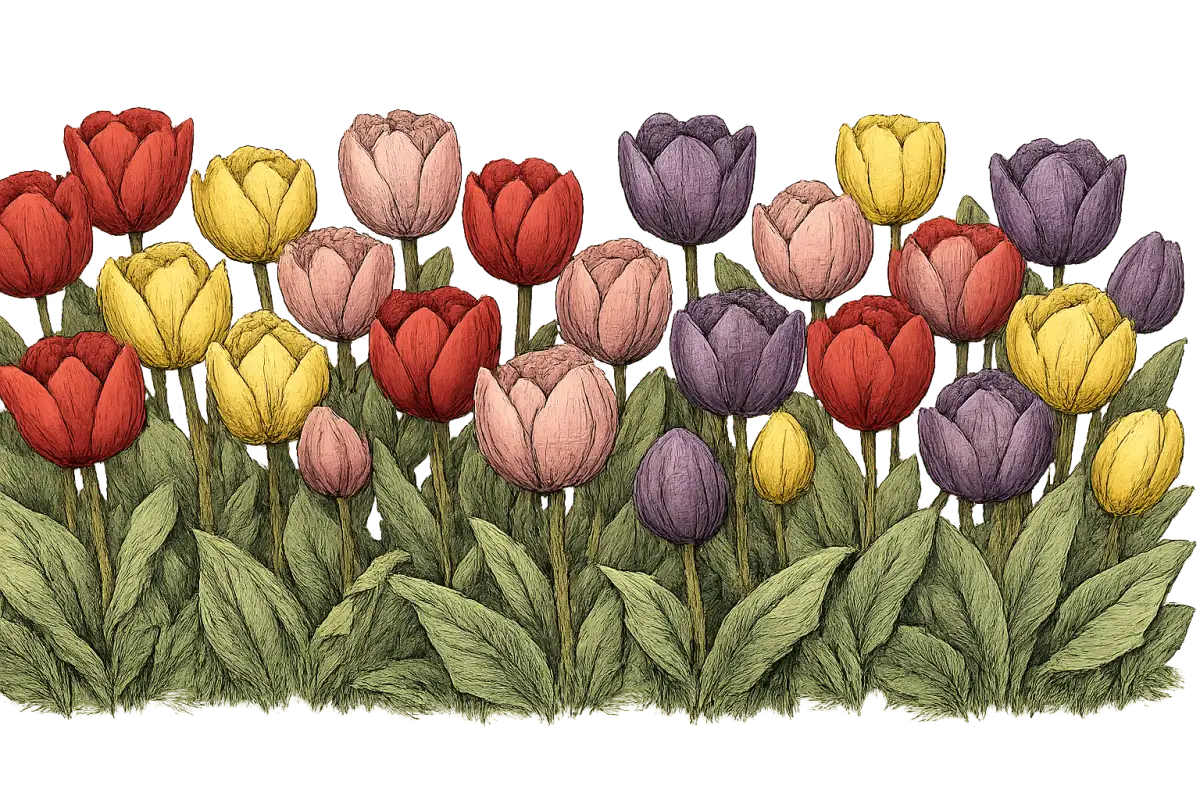
Best Tulip Varieties by Zone
This is where so many gardeners give themselves an impossible task. They buy whichever tulips have the most beautiful picture on the label — usually Parrot or Double Late varieties — and then wonder why they do not return after the first year. The truth is that some tulip classes were bred for spectacle, not longevity, and no amount of perfect care will make a Parrot tulip perennialize like a Darwin Hybrid.
Iowa State Extension specifically recommends three classes for gardeners who want tulips that genuinely return: Darwin Hybrids, Fosteriana (Emperor) types, and species tulips. Everything else should be planted with annual expectations — which is fine, as long as you plan for it.
Here is what to expect from each major class:
Species tulips are true perennials, lasting ten to twenty years or more. They are smaller and more delicate-looking than the big hybrid types, but they naturalize, multiply, and return with zero fuss for decades. Darwin Hybrids produce the tall, stately, large-flowered stems most people picture when they think of tulips, and they return reliably for three to five or more years with proper care. Fosteriana types are similarly long-lived, with a somewhat shorter stature and earlier bloom time. Kaufmanniana tulips are the first to open in spring — sometimes March — with a charming waterlily shape and reliable three to five year return rate. Triumph, Parrot, Double Late, and Fringed tulips are one to three year plants. They are gorgeous. Enjoy them. Replace them.
Cold Zones (3-4): Where Winters Do the Work for You
Zones 3 and 4 are, in a genuine sense, tulip paradise. The sustained cold delivers far more than the twelve to sixteen weeks of vernalization tulips require, and nearly any class will bloom magnificently in the first year. The challenge here is not the winter — it is the short growing season and the occasional late spring freeze that catches early-blooming varieties.
For tall display planting, 'Apeldoorn' is the Darwin Hybrid I reach for first in this zone: cherry-red flowers on twenty-four to thirty inch stems, proven in extreme cold, and a reliable returner for three to five years or more. 'Pink Impression' delivers the same vigorous Darwin Hybrid performance in a warm rose-pink with large, luminous blooms. For a creamy counterpoint, 'Purissima' (also sold as White Emperor) is a Fosteriana type of unusual longevity — exceptionally long-lived even for its class, with a pure white bloom that makes every companion color sing beside it.
For naturalizing — planting in drifts that will multiply and spread over the years — species tulips are unmatched. Tulipa tarda is the most reliable naturalizer I know: small yellow-and-white star-shaped blooms, only four to six inches tall, and it spreads prolifically over time. T. praestans 'Fusilier' is a species worth knowing for its unusual habit of producing multiple blooms per stem in a saturated orange-red — it reads like fire in early spring and is fully hardy to zone 3.
Plant Darwin Hybrids and Fosteriana types at six to eight inches in zones 3-4. The cold soil does the protective work that deeper planting provides in warmer zones. Mulch two to three inches after planting.
Standard Zones (5-6): The Full Palette Opens Up
Zone 5 is where the full range of the tulip world becomes available, and zone 6 adds the first whisper of summer heat that makes drainage management critical. These are the zones where thoughtful variety selection and deep planting start to make a noticeable difference in multi-year performance.
In zone 5, plant Darwin Hybrids at eight to ten inches for perennializing. 'Apeldoorn's Elite' is a bicolor variant — red petals edged with yellow — that creates a warmer, more complex effect than the straight 'Apeldoorn' and returns just as reliably. 'Red Impression' earns its name with an unusually deep, saturated crimson that photographs beautifully and holds its color well in variable spring weather. On the Fosteriana side, 'Yellow Purissima' is the canary-yellow companion to the white original — early-blooming and long-lived.
For the earliest possible tulip blooms — sometimes March in zone 5 — add Kaufmanniana types to the front of the bed. Their low, spreading, waterlily-shaped flowers open before anything else in the spring border and extend your total tulip season by three to four weeks. Layer them in front of taller Darwin Hybrids for a staggered display.
For naturalizing in zone 5, Tulipa sylvestris is an underused gem — a fragrant, nodding yellow species tulip that handles partial shade, making it the right choice for woodland edges and spots under deciduous trees. Tulipa bakeri 'Lilac Wonder' produces small, delicate lilac-pink blooms with a golden center; Iowa State Extension specifically recommends it for multi-year performance, and it is rated through zone 9, making it one of the most zone-flexible species choices available.
In zone 6, deep planting becomes essential. Get Darwin Hybrids and Fosteriana types down to eight to ten inches, and make sure the site does not receive summer irrigation from lawn sprinklers. 'Ivory Floradale' is a Darwin Hybrid in creamy ivory that pairs beautifully with the purple alliums that bloom right after tulip season ends — a classic spring-to-early-summer color transition. Tulipa turkestanica is the species choice that consistently surprises people: cream petals with an orange center, and each bulb produces up to twelve stems. A single established clump becomes a cloud of small, starry blooms that reads as lush and abundant even at its modest four-inch scale.
Warm Zones (7): Managing the Heat
Zone 7 is the transition zone where summer heat becomes the primary management challenge. Winters still provide enough cold for tulips to bloom — typically ten to fourteen weeks, right at the minimum threshold for most varieties — but the long, warm summers shorten bulb longevity noticeably. Darwin Hybrids that return for five or more years in zone 5 typically give two to four years in zone 7. Expectations need adjusting, and variety selection matters more here than anywhere in the cool zones.
Afternoon shade is your friend in zone 7. A site that receives morning sun and afternoon shade extends bloom duration, reduces heat stress on the foliage during the critical post-bloom energy-storage period, and keeps soil temperatures lower through summer. Consider the north side of a building or a bed shaded by a deciduous tree whose canopy arrives after the tulips bloom.
Plant Darwin Hybrids and Fosteriana types at ten to twelve inches in zone 7. The extra depth keeps the basal plate in cooler soil during summer and meaningfully slows the bulb division that leads to decline. 'Apeldoorn' and 'Golden Apeldoorn' are the most forgiving of the Darwin Hybrids in marginal chilling conditions, making them the sensible first choice here. 'Orange Emperor' (Fosteriana) has a lower chilling requirement than most hybrids and opens early, finishing before the warmest spring temperatures arrive.
For long-term investment in zone 7, species tulips are the clear answer. Tulipa clusiana, the Lady Tulip, is slender and elegant — red-and-white striped exterior petals that open to reveal a white interior — and it handles heat with a grace that most hybrids cannot match, persisting reliably through zone 8. 'Lilac Wonder' is rated to zone 9 and will naturalize over time in favorable spots in zone 7.
In zone 7b specifically, consider supplementing marginal natural cold with four to six weeks of refrigerator pre-chilling before planting, especially for Darwin Hybrid varieties. This tops up the chilling bank and improves flower quality in years when winter is mild.
Warm Zones (8-10): Pre-Chilling Is Mandatory
Zones 8 through 10 present a straightforward trade-off: you can still grow beautiful tulips, but you need to provide the cold that winter will not. Pre-chilling bulbs in the refrigerator before planting is not optional in these zones — it is the mechanism that makes tulips possible at all.
Zone 8: Refrigerate bulbs at 35-48F (ideally 40-45F) for eight to ten weeks before planting in November or December. The critical precaution — and this matters more than almost anything else — is to keep chilling bulbs completely away from ripening fruit. Apples, bananas, pears, and other ripening fruits release ethylene gas. Ethylene penetrates the bulb and destroys the developing flower bud inside. A pot of tulip bulbs chilling in a refrigerator next to a bag of apples will produce leaves but no flowers. Use a separate refrigerator if you have one, or seal bulbs in a container away from produce.
Hybrid tulips in zone 8 are best treated as annuals — they will not return. The exceptions are Tulipa clusiana and 'Lilac Wonder', both of which have lower chilling requirements and the best chance of naturalizing in favorable zone 8 spots. Kaufmanniana and Single Early types have shorter chilling requirements than other hybrid classes and are the best hybrid options here when pre-chilled properly.
Zones 9-10: Pre-chill for ten to fourteen weeks. Plant in December or January in the coolest microclimate available — north-facing beds, spots shaded by buildings during afternoon. Container growing is strongly recommended in these zones: it gives you complete control over soil temperature and drainage, and allows you to move the display position when the tulips are blooming. After the display ends, dump the bulbs, refresh the container for summer plantings, and budget for new bulbs next fall. This is simply the cost of growing tulips in warm climates, and it is worth paying.
Quick Reference: Top Picks by Zone Group
| Zone Group | Top Varieties | Class | Why |
|---|
| 3-4 | 'Apeldoorn', 'Purissima', T. tarda | Darwin Hybrid / Fosteriana / Species | Maximum cold hardiness; proven returners |
| 5-6 | 'Apeldoorn's Elite', 'Ivory Floradale', T. sylvestris | Darwin Hybrid / Species | Full palette; season-spanning with Kaufmanniana |
| 7 | 'Golden Apeldoorn', T. clusiana, 'Lilac Wonder' | Darwin Hybrid / Species | Heat tolerance; species for long-term value |
| 8 | T. clusiana, Kaufmanniana types, Single Early | Species / Kaufmanniana | Lower chill needs; naturalizing potential |
| 9-10 | T. clusiana, 'Lilac Wonder', Single Early | Species | Minimum chill; treat all hybrids as annual |
Watering: When to Give It and When to Stop
Tulip watering is organized around a principle that sounds simple but requires real seasonal discipline: water during root growth and active foliage; keep dry during dormancy. The failure point is almost always the summer, when tulips share beds with plants that need irrigation and the dormant bulbs suffer silently for it.
Fall establishment: Water thoroughly at planting to settle the soil and trigger root initiation. In dry falls, water weekly — roughly one inch per week including rainfall — until the ground freezes. This is the window when roots are growing from the basal plate of the bulb, anchoring it and absorbing nutrients that will fuel spring growth. Do not let newly planted bulbs dry out completely before the ground freezes.
Winter: In zones 3-7, where the ground freezes, no supplemental water is needed. The bulb is dormant in frozen soil. Snow cover is actively beneficial — it insulates and provides slow-release moisture at snowmelt.
Spring: As growth begins, keep soil moderately moist through the bloom period and for six to eight weeks afterward, while foliage is green and actively photosynthesizing. Target about one inch of water per week, including rainfall. Water at the base of the plant rather than overhead — wet foliage invites Botrytis tulipae, the fungal disease known as tulip fire. Continue watering after bloom ends, while leaves are still green. The leaves are feeding the bulb. Stop when the foliage turns yellow.
Summer: Stop watering. Completely. This is the most important watering instruction for tulips, and the hardest to follow when mixed beds are receiving regular irrigation. Wet soil during summer dormancy is the primary killer of tulip bulbs. The rot sequence is predictable: summer moisture softens the papery bulb skin, warm temperatures activate soil-borne fungi, the fungi enter through the compromised skin, the bulb rots silently underground, and the following spring nothing comes up. By the time you realize what happened, it is too late for that season.
The practical solution is thoughtful site selection: plant tulips in beds that do not receive summer lawn irrigation or sprinkler overspray. Raised beds with excellent drainage tolerate summer rain far better than in-ground plantings in heavy soil. If tulips must share a mixed bed with summer-active perennials, use targeted drip irrigation that delivers water to the perennials without saturating the tulip zones.
The Post-Bloom Rules That Determine Everything
I want to spend a moment on post-bloom care because it is, without question, the most common place where gardeners sabotage their tulips' return. Everything from planting to bloom goes well. Then the flowers fade, the foliage starts looking untidy, and one quick cleanup session undoes the whole investment.
Deadhead the moment petals fall. As soon as the bloom fades, snap off the flower head. Leave the stem — it continues to photosynthesize. Removing the spent bloom prevents seed pod formation, which is extremely energy-expensive for the plant. Seed production diverts energy that would otherwise go into the bulb as stored reserves for next year's flower. This takes five seconds per plant and is the single most impactful post-bloom action you can take for perennializing.
Leave the foliage completely alone. After blooming, the leaves are the bulb's only source of food. They produce sugars through photosynthesis that are transported down to the bulb and stored as energy for next year's flower. The flower bud for the following spring forms inside the bulb during this post-bloom period. Cutting the foliage is the equivalent of unplugging a battery charger before the battery is full.
The foliage needs six to eight weeks after bloom ends to complete this energy transfer. In most zones, that means waiting until late June or early July. Wait until leaves have turned completely yellow or brown before removing them — not partially yellow, fully yellow. Do not tie or braid the leaves into neat bundles, either; this reduces the surface area exposed to sunlight and cuts photosynthesis significantly.
I know the yellowing foliage is unattractive. Every gardener struggles with it. The practical solution is to interplant tulips with perennials that leaf out at exactly the right time: hostas, daylilies, and hardy geraniums all expand their foliage just as tulip leaves are dying back, naturally screening the mess. This is actually one of the most elegant design moves in a spring garden — it solves the aesthetic problem while doing zero harm to the tulips and creates a bed that transitions seamlessly from spring to summer without a gap.
Protecting Your Bulbs from Squirrels, Voles, and Deer
Here is a reality of tulip growing that does not get enough attention: tulip bulbs are genuinely delicious to wildlife. Unlike daffodils, which contain toxic alkaloids that every creature instinctively avoids, tulip bulbs are starchy and nutritious. Squirrels will dig up a freshly planted bed in an afternoon. Voles will tunnel underground and consume entire plantings without leaving a trace on the surface. Deer will clip emerging shoots and buds in spring.
Managing this pressure requires layering several strategies together, because no single method is reliable on its own.
Deep planting is the easiest passive protection. Squirrels rarely dig below six inches, and planting at eight to twelve inches puts bulbs beyond their typical reach while simultaneously improving perennializing. This alone significantly reduces squirrel losses.
Clean up immediately after planting. Squirrels are attracted to freshly disturbed soil and the papery bulb skins left behind during planting. Remove all debris, tamp the soil firmly, and mulch right away. Watering in the freshly planted bed reduces the "freshly dug" scent that draws them.
Interplanting with daffodils and alliums is the most aesthetically elegant protection strategy available. Daffodils are completely ignored by squirrels, deer, voles, and rabbits — their toxic alkaloids make them unpalatable to every garden pest. Planted among tulips in alternating rows or mixed freely, they mask the tulip bulb scent and train animals to treat the bed as unrewarding. Alliums planted in the same bed extend this deterrent effect into late spring and add the next wave of bloom right as tulip season ends. The planting combination actually makes the garden look better while solving the pest problem.
Wire mesh cages are the gold standard for high-value plantings or areas with severe vole pressure. Cut hardware cloth with half-inch mesh openings into basket shapes, place bulbs inside, and backfill. The small openings exclude all rodents while allowing roots and shoots to pass through freely. The cages last for years underground. Fussy to install for large numbers of bulbs, but genuinely permanent protection.
For deer, the only fully reliable physical barrier is an eight-foot fence. In beds without full fencing, commercial repellents like Liquid Fence or Bobbex provide partial protection, but they require reapplication after rain and animals eventually habituate to them. The more sustainable approach is again planting deterrent companions — a border of daffodils and alliums makes the whole bed less appealing.
The Mistakes That Kill the Most Tulips
Looking across all the failure patterns, three themes account for the vast majority of tulip disappointments:
Cutting foliage too early is the single most common reason tulips fail to return. It is also the most counterintuitive mistake, because the impulse — to tidy up the messy, yellowing leaves after bloom — is completely natural. The fix is simply knowing what is happening underground and giving the foliage its full six to eight weeks.
Planting too shallow sets up progressive decline. Each summer, shallow bulbs warm up, split into daughter bulbs, and the next spring produces fewer and smaller blooms until the bed fades entirely. Go deeper: eight to twelve inches in most zones.
Choosing the wrong variety class creates a mismatch between expectation and reality. Parrot and Double Late tulips are stunning and meant to be annual. Darwin Hybrids, Fosteriana, and species tulips are bred to return. Know what you are buying before you plant.
Secondary mistakes — overwatering during summer dormancy, neglecting to deadhead, planting in poorly drained soil, attempting spring planting — are all serious, but they follow the same underlying logic: respect the dormancy cycle, provide drainage, and match your variety choice to your zone and your goals.
Forcing Tulips Indoors: Blooms in January
If the idea of tulips blooming in your kitchen in the middle of winter appeals to you — and it should — forcing is entirely achievable with a straightforward process. It is also the primary strategy for gardeners in zones 8-10 who want real tulips without relying entirely on outdoor performance.
Forcing works by replicating the tulip's natural cycle artificially: you provide a cold period, then introduce spring warmth, and the bulb responds exactly as it would outdoors.
Purchase large, firm bulbs in September or October when selection is best. Avoid any bulb that is soft, moldy, or damaged. For forcing, Darwin Hybrids and Single Early types are the most reliable. 'Apeldoorn' produces classic cherry-red flowers on strong indoor stems. 'Monte Carlo' is a Double Early in clear yellow with full, peony-like blooms that look extraordinary in a vase. 'Purissima' in pure white is as elegant indoors as in the garden.
Pot the bulbs in containers with drainage holes, tips just at or slightly above the soil surface, pointed end up. Pack them close together — tight spacing is fine for forcing. Water thoroughly. Label the pot with variety name and date.
Then chill for twelve to sixteen weeks at 35-48F. A spare refrigerator is ideal. The ethylene warning from the outdoor section applies here too, and it is even more important in the confined space of a refrigerator: keep bulbs completely away from ripening fruit. Apples, bananas, pears — all release ethylene gas that destroys flower buds inside the bulb. A pot of carefully chilled tulips stored next to a bag of apples will give you leaves and no flowers. Keep bulbs in a sealed container, or use a refrigerator that does not store fruit.
During chilling, keep soil barely moist — not wet, not bone dry. Check every two to three weeks.
After twelve to sixteen weeks (January or February for October-potted bulbs), move pots to a cool, dimly lit room at 55-60F for one to two weeks. This simulates early spring. Shoots will begin to elongate. Then move to a bright window at 65-70F. Rotate pots daily so stems grow straight rather than leaning toward the light. Blooms typically appear two to four weeks after bringing pots into warmth.
To extend the display, keep the room cool — 60-65F extends bloom life significantly. Move pots to a cooler spot at night. Individual tulip blooms last five to ten days in cool conditions.
Forced bulbs are exhausted after bloom and should generally be discarded. If you want to try planting them outdoors afterward, Darwin Hybrids have the best recovery potential, but it is not guaranteed.